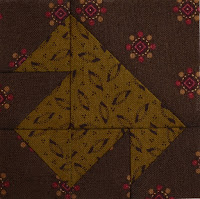
Block 15 Triple Rail
Pieced just like a four patch. I fanned the seams in the centre.
Block 16 Maggie's Mystery
When cutting for this block I focused on the direction of the prints. Block 17 Thrifty Not sure if I like how bright the centre square is but it stays for now.
Block 18 Double Four Patch
As the pieces get smaller I use tweezers to pick them up and transport from my cutting station to my pressing and sewing station. Tip: When seeking precision always stand while cutting. Half-Square Triangles Following are techniques I use to create half-square triangles. The half-square triangle to the left has been distorted by pulling, tugging and vigorous pressing. Notice how the centre seam is discoloured, tends to turn up at the corners and the seam isn't straight? This square will be challenging to square up and that wow in the seam will really show when the finished size is 2" and smaller. This half-square triangle has been accurately pressed. The centre seam should remain at a consistent 45 degree angle. Pressing Tips: 1. Place the square on the ironing surface with the fabric that you will be pressing the seam toward on top and the seam allowances towards you. Keep the pieces right sides together as they came out of the machine. 2. Set the seam by placing a hot, dry iron on cotton setting on top of the seam. 3. Lift the top fabric and gently finger press along the seam. Molding the fabric to the thread. 4. Place the tip of the iron on the seam and press against then up and over the seam allowance. Hold the iron in one place while pressing. No need to move it back and forth as this will create a sheen on the fabric. Tips for cutting half-square triangles: Creative Grids Ruler Itty Bitty Eights 6 x 6 This is my favourite ruler for cutting half-square triangles. This ruler not only provides great accuracy but also has a bit of grip under the ruler which helps to hold the fabric while cutting.  If you don't have one of these wonderful rulers I have used the Olfa 6 1/2" square ruler for years with great precision. Tip: If the top corner of your block tends to run away from the blade and shift under the ruler no matter how sharp your blade is place a 1" or longer piece of 1/8" wide double sided tape on your cutting mat. Set the half-square triangle on top of the tape and cut. I started doing this when I was cutting 100's of 1 1/2" half-square triangles and the corners kept shifting. With the tape there is no more shifting. Hint: You can easily remove the tape from your mat by rubbing your index finger on top of it. Block 19 Half-Square Triangle I created my half-square triangles as per 365 Challenge quilt tutorial I cut my squares a little larger than suggested in each of the patterns for a bit more wiggle room.
Make sure to watch the direction of the print when creating these little half-square triangles. Placement of fabric before drawing the line for the centre seam is important. To avoid unpleasant surprises after placing the fabrics right sides together fold the top fabric back and take a peek to make sure print will be in the direction you are intending.
Block 21 Broken Wheel
Sew the top two squares together. Press seams to the left. Sew the bottom squares together. Press seams to the right. Sew the centre seam and fan. Note: I have pieced these little pinwheel blocks in several different ways and have found that following the above stitching order provides the most accuracy with all those seams in the centre coming together like magic. Block 22 Broken Dishes Tip: When pressing seams press two to the light and two to the dark so they oppose. Piece like a four patch. Block 23 Small Triangles Pieced same as Broken Dishes. Remember to press opposing seams. Block 24 Mixed T Cut and sew according to the pattern. Press the seam for the bottom left triangle to the light all the rest to the dark. This will help eliminate bulk in the seams and provide greater accuracy when piecing. Just when I thought they couldn't get any cuter... January 25 Lost Ship Block 26 True Blue Things are getting a little smaller with this cute little block. Pressing. Fan the seams between the four patches. I think this is my favourite block so far... Block 27 Jacks on Six or maybe this one... Remember to really study your blocks and oppose seams when needed for a perfect match. Well that's all the blocks I've done so far. Two more have arrived since finishing block 27. We have TopStitchers Club starting up in a couple weeks so I'm designing and creating our new project. I'll post pictures. Happy Stitching, Shelley |

Thursday, January 28, 2016
365 Challenge Blocks 15 - 27
Subscribe to:
Post Comments (Atom)


No comments:
Post a Comment